Showing posts with label eastern front. Show all posts

Wednesday, April 3, 2019

Spearhead test battle with a kriegspiel twist

I built enough forces to play the introductory scenario "Attack This" from the Spearhead rulebook. It's a small one with just a battalion worth of troops per side and a 30" table representing a three kilometer square of actual terrain. I decided to play it solitaire to teach myself the rules. I've played the cold war variant a few times, but I have to admit that my opponent has handled most of the rules.

A simple solitaire game would have been a bit dull, so I invited a couple of voluteer generals from a wargaming Facebook group I hang out in to form the battle plan for their respective sides and do all the tough decisions during the battle without seeing all the action. With limited knowledge of the battleground and the mechanics, I hoped to create a kriegspiel-like experience.

I sent them both a quick brief of the situation and some technical notes on the rules which would affect their deployment. Here's the material (translated from Finnish)

Scenario map I enclosed in both briefings (North to the top)

"aerial reconnaissance" photo I enclosed in both briefings


German briefing: 
Leningrad front, May 1942
---------------------------------
The winter has been relatively quiet once the siege of Leningrad began in 1941. Come May, things have become more lively however, and the Soviets are on the move. The first battalion of the 124th infantry regiment has been assigned on a three kilometer stretch on the front. Intel suggests the Soviets are massing armored units in this area so an attack on your sector seems likely. Division has sent additional AT guns to you, but no armored support is available. The Soviets must not be allowed to break through!

Troops available:
----------------------------
124th infantry regiment, first battalion.
The battalion consists of the HQ, three infantry companies, a machine gun company, a mortar platoon and a reinforced AT company. Offboard artillery is available.


The German player enclosed this very cool battle plan (It's only in Finnish, sorry!) link to pdf


Soviet briefing: 
Leningrad front, May 1942
---------------------------------
The Soviet Union has achieved the impossible and stopped the fascist warmachine at the brink of ruin. The grand German offensive lost momentum late in 1941 and now it is our turn to show them that socialists know how to blitzkrieg as well! The main attack is planned in Kharkov to retake the city from the Nazis, but besieged Leningrad is also in need of relief. The 92nd armored brigade is to punch a hole in the German line and cause enough casualties for the Germans so that the breakthrough can be exploited. 

Troops available:
---------------------------
32. Tank Corps, 92. Tank Brigade
The Tank Brigade consists of the brigade HQ and two armored battalions.


The Soviet player enclosed this plan:


"The red line marks the route of the brigade HQ.
The first armored battalion reinforced with the recon platoon advances on the eastern side of the line so that the KV-1 platoon with the T-34's operate closest to the HQ along the line Hill 301 and the field -> The forest east of Hill 302 -> the Pass between Hills 303 and 304. The two T-26's of the battalion and the other T-34 platoon will circle around the wood with the field (to distract and draw fire).
The second armored battalion reinforced with the engineers will advance directly via hills 301, 302 and 303 and aim for a quick breakthrough attack. If necessary, any fascists hiding in the woods next to hill 302 will be driven out by the engineers and the tanks of the 2nd armored battalion."

The battle:

Now I had what I needed to run the game without "playing against myself". The only adjustment I needed to make was shift the position of both players' HQ units so that their entire OOB was in command range. The German HQ was moved from the forest to hill 304 and the Soviet HQ had to start moving a bit more to the east from the initial plan.


Throughout the game I would give the commanders updates on their situation. I gave them good information on things happening in the vicinity of their HQ, but was vague on things happening further out. This is a small scenario so there wasn't much for them to do mid-battle (I handled all movement and combat for the forces according to the plan) but they did do small adjustments to the plan based on how they perceived the events.


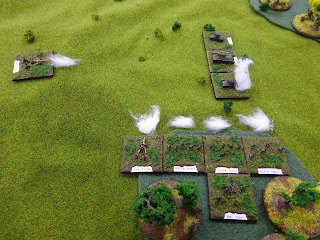
Turn 1 (south at the top of image): The Soviets advance according to plan, but no visual contact is yet made with the enemy. The Germans spot the Soviet armor (armor moving in the open is seen 18" out while infantry in woods only to 3")

Turn 2: The soviet "feint" to the east comes under fire by Pak35's. They fail to damage the tanks,but a German infantry company reaches the soviet T-26's with their panzerfausts with predictable results. The Soviet recon platoon spots the German company in the.. lets call it "Half acre wood" and the tanks close in to fire at them.

Turn 3: The Soviets on the eastern flank suffer losses and retreat towards the main group. A firefight breaks out at the half acre wood, but with no results. At this point, the Soviet player decides to commit forces from this breakthrough force to flank the half acre wood. One of the T-34's destroy a Pak35 platoon at hill 303.
Turn 4:  The engineers and tanks roll into the half acre wood, making good progress. Those flamethrowers the engineers have sure come in handy when fighting in cover! The German infantry company moves from the woods in the east towards Hill 305 according to the pre made plan, but come under fire by the tanks, also retreating.

Turn 5: The battle for the half acre wood looks bad for the Germans, but they are also causing casualties to the Soviet tanks. The Germans consolidate their position along hills 304-305.
Turn 6 (end): The German forces hang on in the half acre wood, and the Soviets have an unobstructed path to go for the breakthrough, but their morale fails them. Soviets roll their grade during the battle and they came out Green. That means that they roll whether they retreat at 33% casualties, and failed that roll.


The communication between me and the generals was nice and atmospheric during the game, but I cannot be arsed to translate it (If anyone actually reads this far, give me a shout. I think few people read battle reports but rather just skim the pictures). I think with a bigger game there's lots of potential for some double blind action but I need to paint a big bunch of figures for that. As for this game, it was surprisingly entertaining with just the single battalion per side. Sort of a microarmor skirmish game!

Thursday, February 13, 2014

TooFatLardies' Chain of Command: First game and impressions

There's been some buzz on the net about Chain of Command lately. It's a "platoon plus" sized WW2 skirmish where each player typically controls a platoon of infantry along with a bit of support like a tank or weapon teams. The intro videos TooFatLardies have published showed an interesting spawnpoint based system and even though the game looked like there's a lot of randomness going on I bought the PDF to give it a go. I went to my friends' place where we set up an eastern front scenario and played it with three players learning the rules as we went on.

The game starts with a "patrol phase" where players alternate turns moving patrol markers on the table. These markers must form a continuous chain with max. 12 inch gaps and once the markers encounter enemy markers, they are locked 12 inches apart. This serves to draw the line of battle on the table and is a nice little metagame to try and get an edge over your opponent with. When all the markers are locked, they are used to deploy three or four "jump off points" on the table. Let's just call them spawnpoints because that's what they are. These spawnpoints are placed in cover outside enemy LOS and can be used to deploy units on the table during the game. The idea behind this is that they represent areas on the field where the platoon leader can send his units to without the enemy seeing them advance, giving the game a fog of war element and the players some tactical flexibility. It pays not to deploy all your troops at once but see how the situation develops and keep some reserves. The spawnpoints also serve as victory locations and their capture denies the enemy of their use. A bit quirky but works well in practice.

We played a very basic match with just two platoons (3 squads and a commander) of similar infantry facing each other. Additional support was minimal. The German side got an adjutant leader to the platoon and the Soviet side took a sniper team. The terrain was laid out to represent a village in some woods so there's plenty of cover and LOS obstacles around.

The opening setup

The core gameplay happens in "phases" which each player alternates taking. During these phases the phasing player rolls typically five dice and consults the pips. 1's allow him to activate small teams, 2's allow him to activate whole squads (which typically consist of a rifle section and a LMG team), 3's activate junior leaders (squad NCO's who have better flexibility in commanding the squad than what you get on a 2), and 4's activate senior leaders (typically the platoon HQ who can command all troops in his command range). The amount of 6's rolled indicate whether the next phase will alternate to the other player, whether you get a double turn, whether the turn will end or whether there will be a random event.

All rolled 5's increase the players' "chain of command dice" which is another special mechanic to activate special abilities. You accumulate pips on the die for each 5 rolled, and once you have six pips, you have one special ability to use. These abilities range from moving spawn points to interrupting the opponent's turn to springing ambushes. Having one of these points in use while still having some troops undeployed is a good way to keep your opponent on his toes.

The Soviets move fast to claim a German spawnpoint.

The Soviet player got a good start by rolling a double turn on his first roll. This means he rolled a double 6, and was allowed to take another turn after completing his first. This allowed him to deploy a squad of infantry on the table and move it to take one of the German spawn points before the Germans could deploy anything. I guess they really caught the Germans with their pants down! The Germans quickly deployed one of their squads to the nearest spawn point and moved to reclaim the lost one. If a turn ends when one of your spawn points is in enemy hands, it is a bad blow to force morale. Too bad the Soviets had time to deploy their squad on overwatch, and there was no other way to get to the spawn point but over open ground.

The Germans lurk behind the house as the squad leader tries to figure out what to do.
Reasoning there is no other way, the NCO split his squad and had the LMG section set up on the right side of the house pictured above to lay down covering fire and have the rifle section assault the Soviet position from the left. Too bad it was the LMG team which drew the Soviets' overwatch fire and the team sustained a casualty and enough shock to pin them.

The LMG is pinned.

The Rifle section advances on the Soviets.

Meanwhile on the Germans' right flank, the Soviets began deploying and moved to take a fence along the road in the middle of the table. This game them hard cover whereas the Germans advancing towards them from the woods had only light cover. A firefight started and the Germans were indeed racking up more casualties and shock. This prompted them to deploy their third and final squad to help the second one, and the increased firepower helped them pin the Soviet squad. This was not before the German squad lost their NCO though. The Soviets deployed their third squad in the center of the table and advanced towards the ruin near the center.

The Soviets take position behind the fence.

The Germans gain numerical superiority and whittle down the pinned Soviets
Meanwhile near the captured German spawnpoint, the Germans launched their attack. They could not stall any further because the third unengaged Soviet squad was one move away from coming to assist the ones who captured of the spawnpoint. The platoon adjutant commander came to the scene and after some verbal advice, the squad NCO attacked. The rifle section lobbed a grenade on the Soviets causing a casualty and a point of shock, and then charged. The result was messy. Since the Soviet squad had not been pinned, they were all too ready to receive the Germans and killed them all in a brutal round of rattling dice, losing only one man in return. The Squads' LMG was shot up by the center Soviet squad. The platoon adjutant found himself alone against two operational Soviet squads.

A grim result of the German charge.
On the other flank, the Germans got their only success of the day. The fresh..er German squad charged the pinned Soviet squad at the fence with much more success than their compatriots, routing those who would not die. When they tried to advance across the road to threaten the Soviet spawnpoints, they were caught in Soviet fire from the Squad at the center of the table and were pinned.

The platoon adjutant was captured in melee, and at that point the Soviet player used one Chain of Command point to end the turn, which crippled the German morale. Their morale had dropped steadily during the match because of losses and the spawnpoint was the final straw. A total defeat for the Germans.

Closing thoughs:

Chain of Command seems like a fresh contender to the platoon-sized ww2 ruleset race along with Bolt Action, Rate of Fire and the like. The game introduces mechanics I haven't seen elsewhere and the system works well. The rules are written in a way that might confuse the player a bit. There were several points where we were uncertain on how to interpret the rule, and the command system takes some getting used to. The book refers to Units, Squads, Sections and Teams with different rules, which can add to the confusion. The book says squads and sections are the same thing, but could they not have used just one of the terms since you already have to differentiate between units, squads and teams when doing activations?

The game can also be a bit random. The melee system seems to give a lot of dice for leaders in melee, making a lonely leader more than a match for four men attacking him. Rolling poorly on activations might leave you frustrated, but since each phase represents only a few seconds, having a squad unable to activate for two or three phases is ok realism-wise. People have complained that the game only lasts for a turn or two, but they're missing the point. The end of the turn means a "significant lull in the battle", which might not even happen in every match. It didn't in our game.

Apart from these gripes, the game works well. Movement and firing is easy and the suppression system works as it's supposed to. I'll need to play a couple more games to see if this is a keeper however.


Oh, and we played a game of Talisman too.