There's a plague on so meeting people is off. That doesn't mean you can't do tabletop gaming remotely, right? Ever since I did that
Spearhead battle for "remote players" last year, I've been itching to do a bigger one. I still don't have much of a microarmor collection to lean on, but what I do have is a whole lot of 6mm ACW figures and the
Volley & Bayonet ruleset. Poor situational awareness and breakdowns in C2 feature even more prominently in that war than they do in WW2, so it's a perfect candidate!
So, the idea is simply that I run the game in my workshop, and enlist two players whom I will keep contact with via skype, maps, messages and so on. Their task is to play their respective army commanders, issuing orders at the corps or division level. They will plot the routes they wish their troops to advance by, positions they are to take and whether they should defend, attack, probe and so on. The sub-commanders, played by the umpire (me!), will then do their best to fulfill their orders.
The twist of course is that since possible, I will umpire the game as a double blind affair. I will judge how the generals perceive the overall situation, what they "see" on the map based on what reports they are likely to receive, and what remains hidden. I will also try to impose a measure of inaccuracy and uncertainty to the situation in the chaos of battle. During night turns the players are able to form accurate plans and make sure their subordinates get the message, but turning the plan upside down during daytime turns might be another matter.
I haven't played Volley & Bayonet since we played that
150th anniversary Gettysburg game in 2013 (whoah, time flies!), but I remember it suits the purpose well. What it doesn't have is an inbuilt command and control system. In VnB you can do whatever you want and everyone activates every turn. That doesn't pose a problem in an umpired game as I can introduce some uncertainty during gameplay. I borrowed the system of drawing the command path and so on from Spearhead.
 |
| Historical map before tuning |
For the battle I chose
Second Manassas as we haven't gamed that yet, and it's a battle where historically both sides had the opportunity to attack and defend. For the map and icons used, I found a good historical map of the area completed in 1862, so it was brand new at the time of the battle. To make the map more usable for gaming and to have nice unit icons and such, I used
Wonderdraft. I got this recommendation from the Meeples&Miniatures alumnus
Mike Whitaker (thanks Mike!). The software is designed for drawing maps for RPG's, but with a bit of tinkering works nicely for presenting maps in my scenario. I could also do some transparent coloring of the map to make area terrain and hills more apparent, and to add a couple of roads present in the scenario I took from the
scenario book which weren't on the map.
So, now I had the rules, the maps, the players and everything else needed for the game. I built a 6x6 foot table in my workshop, did a whole bunch of unit labels and got cracking!
 |
| My Manassas setup |
5PM - 7PM, 28th August:
The battle starts in the evening of 28th of August, 1862 with
Stonewall Jackson
ambushing a column of Union troops who've been marching up and down the
countryside in search of his corps after Jackson slipped behind
John Pope's
Army of Virginia and took a supply depot at Manassas Junction. Pope's
forces start to converge on the area in the attempt to pin Jackson down
and defeat him. What they don't know is that Lee has been planning the
exact same thing for them and is marching towards the area with
James Longstreet's
wing of the army. Well, there's a good chance my players know that,
being American Civil War buffs, but I told them to forget the specifics.
Besides, once their plans go into action the situation becomes
something they cannot predict very quickly.
Ah,
yes, the ambush. The scenario mandates King's Union division has to
march right into it, so I didn't give the players an option to intervene
at this point, but played the three turns before nightfall on the 28th
myself, involving my players from the night turn onwards. Their
"avatars" didn't arrive on field until the next day anyway, so their
input into the situation should be limited.
Ewell slammed his Division down from Sudley Mountain into the flank of King, sending him running. King's division retreated in two directions so King would spend the night and the first hours of the next morning rallying his men and bringing them together to the hills south of Groveton. Meanwhile Reynolds, alerted by the musketry, swung around and deployed his division on some high ground east of Groveton, facing Ewell. Night fell without any more dramatics and I consulted the players on their plans for the next day.
Plans for the 29th:
 |
| Comparison of plans for the 29th |
Confederate:
Jackson ordered Ewell to hold the position he took in the evening, stay put and wait for Longstreet to arrive the next day. Never one for inaction, he sent A.P.Hill on a flanking march to capture the stone bridge on the other side of Henry House Hill. This move would prove very interesting indeed the next day. Taliaferro would take up Hill's position and defend Sudley Mountain. A sound plan, although there remained a gaping hole in the line between Ewell and Taliaferro. Lee draw his plans once a bit closer to the field tomorrow.
Union:
Pope started to scrape his forces together from around the countryside and had them march to the scene through the night. As you can see, I had to break out my crayons to make any sense of all the different forces marching onto the field. Arriving from the south, Sigel would take his corps between King and Reynolds, McDowell would join King at his position and Porter would move to the Confederate right flank, led by Buford's cavalry. From the east, Heintzelman would take his corps on Henry Hill, leaving Porter behind the hill as a hidden reserve. Reno would take his corps to the Confederate extreme left via exactly the same route A.P.Hill was planning to use.
What makes the Union situation difficult is that they don't know exactly when their forces arrive. As historically, some generals dithered and arrived on the field late despite Popes' historical orders to "attack vigorously at dawn". I gave the dice a say in when each corps would arrive in relation to their historical arrival time, which would make things very interesting especially on the eastern part of the field. The historical Pope was fresh into the army from the Western theatre and had already antagonized his generals with his arrogant behavior which caused a lot of problems. Instead of ordering everyone to attack the Confederates piecemeal, "our" Pope took a more conservative approach and had the center of his line hold position and wait until his forces were collected and probing the flanks.
 |
| Historically, Pope really didn't get along with his subordinates. Or should I say, insubordinates? |
Night turn, 7 - 9AM, 29th August:
Sigel was first on the field, followed by Porter and McDowell. In Volley & Bayonet, march columns on roads have a long "tail", making corps-sized formations several kilometers long. I shortened the columns from what was suggested in the rules, but still they ended up making quite a traffic jam on the road. Unopposed, they could advance to their positions in peace.


Heintzelman arrived on the field at 8AM, being pretty much on time, historically. He proceeded to march towards Henry House Hill, but didn't spot A.P.Hill's division who hadn't yet come into view from behind the northern ridge. This is EXACTLY the kind of emerging dynamic I was hoping to get with this game! With their Gods eye view, the players would never make this kind of mistake, but the Fog of War is merciless in this case. A.P.Hill sent his division over the ridge, notifying Jackson he is proceeding to take Stone Bridge as ordered. There's a kilometer of open ground between the forces however, so Hooker's division had time to form into line to take the charge instead of repeating what happened last evening. Hill attacked Hooker's division head on, but after an even engagement, was pushed back up the ridge. Hooker had shown Hill that it would take more than a flank march to send their soldiers running.
Update to the Confederate plan:
Now that Lee and Longstreet were closing in on the field, Lee put in motion his plan for the day. Hearing upon Hill's attack (he hadn't heard yet it had ran into trouble) Lee ordered Taliaferro to move forward from Sudley mountain to occupy the heights closer to Henry Hill. He sent Anderson to plug the gap between Ewell and Taliaferro, after which him and Ewell would move in on Henry Hill. Jones would deploy behind them in reserve. Wilcox and Kemper would march toward the road triangle south of Groveton and march through the woods towards the Union flank at Henry Hill. Finally, Hood would act as a reserve for them.
 |
| Plan updates, 10AM-ish |
Meanwhile, Ewell sent word to Stuart that he had spotted some Union cavalry south of his position. Stuart's cavalry division came up Warrenton Turnpike and almost bumped in with Buford's cavalry. Now Stuart saw what Ewell hadn't: Porter's corps and King's division behind Buford's cavalry screen. He dismounted his division to provide cover for Longstreet's corps down the turnpike and sent hurried messages to both Lee and Jackson. At the same time, Pope was nearing the end of the long marching column towards the battlefield and started to receive reports on what was happening on the field.
Update to Union plan:
Upon piecing together what he could of the situation, Pope issued a string of orders to his subordinates. He had only limited information that Heintzelman was engaging the enemy near the Stone Bridge, and that nothing had been heard of Reno. He ordered Heintzelman to hold the road to the Stone bridge at all costs and to report his status to him. To Reno he sent queries as to their situation and ordered them to find a way to flank the Confederate left even though Bull Run would only be crossable for them at a road or ford.
Reynolds was ordered to hold position, Sigel should prepare to advance and King should answer whether he has pulled his division together yet and is fit to attack. Finally, Porter should stop delaying and attack through the Confederate cavalry and reach the stream behind which the confederates are holding position.
At this point, dear reader, I have a feeling things are about to get messy.
10AM - 1 PM
Taliaferro's division took new position at Dogan ridge, but lacking further orders, halted. On a traditional wargame the confederate player would have noticed that the enemy line was quite weak at this section of the line and attack, but not today. Actually, the centers of both armies have pretty big weak portions at this point, but both players are pushing their attacks on the flanks.
A.P.Hill made another push at Hooker, but was again repulsed. After this attack, he got orders to refrain from attacking again.
On the southern side of the field, Porter was advancing towards Stuart, but was pushed back by the dismounted cavalrymen. This bought Longstreet enough time to form his divisions into line, send two divisions to strengthen the center of the field, and start the attack on Porter and the Union left flank. Thus, the Confederates had to abandon their plan to attack through the woods, but try and turn the Union flank instead.
The attack started off bloody but the Confederates had some success. Even though exhausting one of their divisions, they forced Porter to refuse his flank. Also, the Confederate artillery had great local superiority in guns at this point of the line, and the result was starting to show on the hill King's division occupied.
Pope arrived on the field and rode to King to check on the situation. The massed confederate artillery was exacting a heavy toll on King's division and had already driven away his guns, but Porter had held and the confederates couldn't turn the union flank. Ewell had made his way closer and was now poised to attack however, and King's division was at the breaking point. To increase pressure on the confederates, Pope ordered Heintzelman to attack A.P.Hill to his north, supported by Reno who had finally arrived on the field and could advance across the stone bridge safely because Hooker had defended the crossing against Hill.
14PM - 17 PM
The evening saw two more attacks. King started to withdraw from the Confederate guns, but at this point Ewell attacked the hill supported by Hood. King's withdrawal turned into a rout as the division suffered a morale collapse. Ewell pursued King into the woods beyond, but bumped into Sigel, who held the line until dark.
On the northern flank, Hooker's and Reno's troops attacked A.P.Hill along the ridge. Stonewall Jackson was present on the scene, and although Hill's line was pushed back, it held in the end, sending the attackers back with harsh casualties.
The day had ended in a stalemate. Neither army yet had the upper hand, and the scenario would continue into the next day.
Situation at the end of the 29th:
In VnB, troops get half of their casualties returned for the next day (rounded down) and routed brigades and batteries return as well. After the dead and wounded had been counted, it looked like the Confederates exacted a heavier toll on the enemy. At a ratio of one strength point equals 500 men, the Union army had lost 16 000 men of their 80 000 strong army. The Confederates had lost 12 000 men of their 70 000. The armies look about equally matched size wise, and neither has clear advantage in terrain, so it will be interesting to see how the battle progresses. Both sides are stretched pretty thin and there isn't much of a reserve, so breaking through the enemy line might be easier than it was today. There are plenty of divisions who fought hard today and are not really in fighting condition tomorrow, so it will be up to the players to decide where they plan to strike and which portions of the line they will hold with worn troops.
Plans for the 30th, night turn:
The generals took stock of their situation during the night and hatched plans for the next day. Pope realized he didn't have much reserve left, so he decided to pull most of McDowell's corps, Ricketts and King into reserve to New Market, and plug the gaps by extending Heintzelman and Sigel. Reno was to bring his guns forward and test if A.P.Hill would crack the next morning. The Union strategy was decidedly defensive at this point.
The armies had battered each other on the flanks with the center left pretty much to stand around all day. Lee figured the moment was good to order an assault on the Union center after a bit of artillery preparation by Longstreet's artillery which had been so effective on the day. If this sounds more like Gettysburg than Second Manassas to you, you're not the only one. The umpire had an evil grin on his face, especially as the Union commander had just ordered the defenses on the very same sector thinned.
In addition, Lee ordered Kemper, who was pretty beat up from the day before to move behind A.P.Hill to support.
30th August:
Their night marches completed without issue, the new day began to the sound of Confederate guns. The massed artillery of the Confederate army supported the advance of their divisions on the center. To the left of the Confederate assault, Reynolds' division hung on to the hill they occupied and threw back Jones' division in shambles before having to retreat before Ewell who had pushed Sigel aside and rushed up Reynolds' flank from the woods.
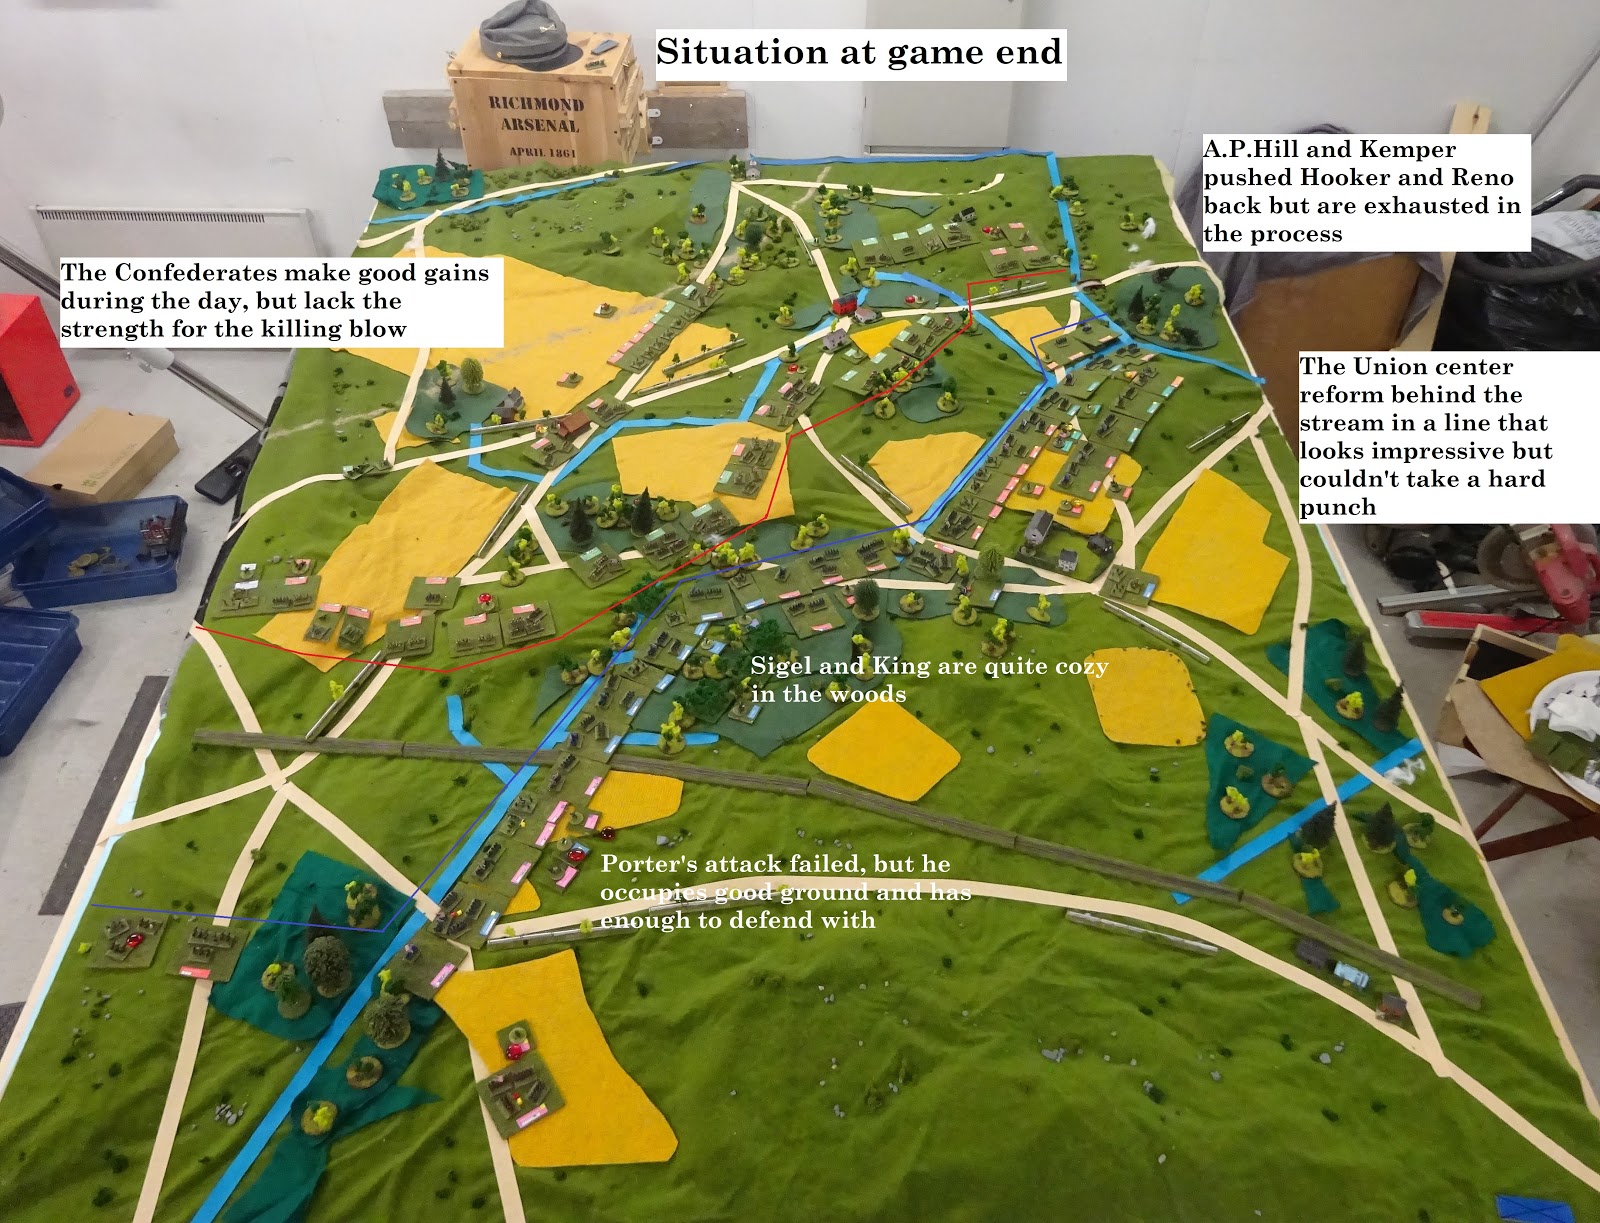
The combined pressure of the confederate attack caved in the Union center around noon. On the Union left Porter pulled back his Corps behind the stream after finding himself unable to respond to confederate artillery effectively. On the Union right, Reno's Corps made an attempt to drive away the Confederate guns, only to be attacked by A.P.Hill and Kemper. Their attack was barely repulsed, but the defenders were exhausted and retreated behind the stream behind them to the next Union line of defense as per the army commanders plan.
At this point both the armies were starting to be pretty weary. Even though previously engaged divisions had some of their losses recovered, they still couldn't really take a hit before becoming exhausted again. Also, I left it to to players to decide which divisions to use based on casualty figures alone, so this also clouded their vision of how much in-game punishment a division could take.
The final actions of the battle saw the Confederates in the center attempt to keep driving the retreating Union troops, but running out of steam in the process. Porter made one last attempt to take back the hill lost by King the day before, but failed to gain any ground.
The result:
Both armies ended up pretty beat up during this battle (as is usually the case in wargames). After the "night replenishment", the Union casualties had been bumped to nearly 30 000 men of the 80 000 engaged, roughly double their historical losses. The Confederates had their 11750 casualties increased to 27500 of their 70 000 men. Somewhere in the ballpark of quadruple losses compared to history, that is. Clearly VnB is much "bloodier" than historical results, as again is usual in wargames.
So how to rule this one? Historically, the Union army marched into the Confederate trap and were beaten back across Bull Run in disarray. That did not happen here, the Union army remained in good order. I think a general rout of an army doesn't happen very easily in VnB as forces tend to run out of steam and be unable to capitalize on breakthroughs without a big reserve. The Confederates enjoyed more battlefield success and took many positions where the Union had the advantage of defense unlike in the historical battle where the Union first banged their head against the Confederate defences before being crushed by Lee's right hook. When thinking the strategic situation, the Confederate army wouldn't be able to take losses like this.
We'll call it a draw.
Thoughts on running a remote "kriegspiel":
Did you make it this far? Sure you didn't just skim through the pictures? I don't blame you, this really ended up being much longer than I planned. So, lessons learned time!
The command system worked ok in my perspective. I would engage the players when something that might derail their plan or require their attention happened. I imposed some lag in them getting information and in the context of VnB settled to telling them the situation close by before their turn and tell about the stuff happening further out after their turn so the enemy would react to their move before they had a chance to make changes to their plan.
I made some "The boys got their dander up!" -rolls during the game to see if some divisional commanders would go off script or take a tempting opportunity, but none came up.
What was interesting about giving players limited intelligence was that it really made them much more careful as they couldn't judge well their odds when attacking. I tried to give them subtle hints when a weakness in a line would present itself, but many times there would have been clearly exploitable situations and terribly weak positions, but since the players didn't know about them and the divisional commanders remained true to their orders, they were not exploited. Especially in the final day there were some really weak divisions out there and had it been a face-to-face wargame the players would surely have taken those opportunities.
Communicating with the players through those maps took some effort, but I hope the map visualizations and player aids I produced were good enough to keep them entertained and informed enough to make judgements their historical counterparts could have done. A few times a day I would draw them a map of the situation as they perceived it, sometimes leaving out accurate reports from the subordinates. Between these I sent out written dispatches from the subordinates with varying degrees of accuracy and alarm. King was pretty beat up during the second day, but downplayed his condition because he wanted to make up for his defeat on the first day and so on.
All in all, this was an excellent game for me and I hope it was good for the players as well. I'm keen to try this again, maybe by doing Chickamauga with a pre-battle campaign sequence which hashes the opening moves a bit so the players can't guess anything about what their opponent is doing. It would also be interesting to do it as a multiplayer affair, but I don't know how that can be pulled off.