Pages

Thursday, December 31, 2015

Dragon Rampant game and first impressions

The only game of Lion Rampant I've played so far was with fantasy miniatures and now the game has its official fantasy "standalone" version, Dragon Rampant. It was only released just before Christmas and I got my copy last week, so it's quite recent stuff. We took our fantasy armies to the field to try it out.

My Goblin army for the day
The game sticks to the tried and true Lion Rampant rules without messing with any of its core mechanics. Armies of maybe 50 figures duke it out with simple "beer and pretzels" rules that promise fun, uncertainty and fast play. Players have a great degree of freedom to design their own force and interpret the prowess of the units they have.

Here's a rundown of the rules to anyone with Lion Rampant wondering what's changed:

- Virtually all game rules are the same
- Restrictions on army composition regarding unit types have been lifted
- Additional special rules for flying, magic and undeath
- New scenarios
- Some new unit types to fit the fantasy theme, such as lesser and greater warbeasts
- Suggested "army lists" for different fantasy races but something you are free to mix, match and reinterpret.
- Rules for "reduced model units" and "single model units" which enables players to use multi-wound monsters to represent that 12 model group (just like we did in our previous Lion Rampant game).

The opposing armies approach each other

Basically it's a repackaged minor modification of the Lion Rampant rules, but it is easy to justify the purchase as the rules are cheap. On top of the rules mods, there's plenty of beautiful fantasy artwork as you would expect from Osprey. They've really stepped up on the wargames market!

For the uninitiated, here's a summary on how the rules work:

- During a turn you roll to activate your units to either move, shoot or fight. Depending on the units, some actions are more difficult to pull off than others.
- When you fail an activation, or when you've activated everyone, the turn is passed to your opponent.
- When moving, no model may move faster than their limit, units must remain within 3" of their unit leader and no model may go closer than 3" of models belonging to other units unless attacking. There's speed reduction for terrain but no wheeling, formations etc.
- Shooting and combat is as simple as it gets. Check ranges, roll a bucket of dice and remove casualties. Morale tests for all units losing models. Those tests are easy to pass initially, but every lost model makes it harder to pass.
- As each unit activation is completed individually, there's no multi unit combat. Which is kind of a bummer because this means there are no real flank/rear attacks either. This is one of the few gripes I have with the rules. Another thing is that games tend to run for some turns after the winner is already clear. The game takes some two hours to play however so don't worry.
- Fighting in terrain makes troops of differing quality equal. Those heavy infantry troops can be fought off by peasants and so on. This is a novel idea which gives players good incentive to include some cannon fodder into their lists as they become more cost effective in terrain. There are unit types which ignore the terrain penalties however.
- The basic recipe gets shaken up by plenty of different scenarios and a "glory system" where players have additional objectives they try to accomplish.

After just two games with the "rampant" system it's still early to draw any conclusions but I'd give these rules three-and-a-half stars out of five at the moment. The rules are quite tactical but also really light and I'm sure there are a lot of games decided by lucky rolls of the dice instead of superior tactics. The main draw of the game is to enable players to put pretty much any models they have on the table again and have a light hearted game with their friends. If marketed properly, I don't see any reason why this set of rules wouldn't enjoy the same kind of success Frostgrave has.

Oh, here are some photos of the game. My orcs were soundly beaten by the Marauders of the North.

Marauder infantry, counts as heavy foot
A greater warbeast attacks the bellicose orcs in the woods.
The warbeast is on the rampage
The orcs find themselves enveloped on both flanks!
With the "no movement within 3" of other units" rule, squeezing you unit through your own line can be surprisingly hard.
The warbeast is brought low by the Goblin general and his bodyguard.
Scouts are quite good at shooting. Not so good at defending against Elite foot.
The giant (elite foot, single model unit) is charged by heavy cavalry and is killed after a bit of to-and-fro combat.
The goblin general is slain by his opposite number.
The last goblins (light infantry) form a spearwall and start throwing javelins at anyone coming too close. It's time to concede defeat.

Friday, December 25, 2015

SCS It Never Snows: Massacre at Osterbeek

I solo-played one of the small scenarios included in SCS It Never Snows, the Standard Combat Series treatment for operation market garden. The scenario lets me play through the defence of Osterbeek where airborne forces desperately try to maintain a foothold east of the Rhine. Instead of a bunch of photos I combined them into a single gif animation to see if the action is easier to make out that way. It would be nicer to have better image alignment but see if you like it:


To be honest, it was a pretty dull affair to play. A small scenario with very little manoeuver but lots of fighting which isn't that interesting in itself. The allies tried their best to maintain a link to the ferry landing (the black arrow) while the Germans attempted to cut them off. The allies came very close to losing that hex a couple of times, but in the end it was the only position they held. They got all their reinforcements across but the Germans destroyed the rest. In the end, the allies had just that one hex but won the scenario because the allies win if they have any units on the other side at scenario end. I'm sure Monty would have been pleased!

We are scheduled to play the full market garden campaign early next year, I'm excited to see how that works out!

Monday, December 14, 2015

Frostgrave: Lich lord scenario 2

The second game in the lich lord campaign put the warbands on a frozen, slippery river. A spellcaster working for the lich lord was looking for treasure at the center of the board and was unfortunate to get sandwiched between two rival warbands. The game worked out pretty much like a normal scenario. The addition of an enemy NPC spellcaster and slower movement/broken ankles due to slipperyness didn't impact the game terribly.

I doesn't quite look like it's being fought astride a frozen river ;)


My warband was on the receiving end of a sound beating. Even though I limped away with three treasures, half of my force was out of action at the end and my freshly recruited barbarian and one of my archers died. After hiring new men to replace the dead, I ended up losing money instead of gaining any. The three levels gained were a mild solace.

My henchmen are wondering when their paint job will be finished.

After three games under its belt, here's my warband composition:

Base: Inn (allows 11 warriors instead of the usual 10)
Summoner level 9
Apprentice
Knight
Barbarian
Apothecary
Man-at-Arms
Archer
Archer
Archer
Thug
Thug

There's a sprinkling of magic items and potions in my inventory but I won't list them just to be able to surprise my opponents :)

Friday, December 4, 2015

Frostgrave: Thaw of the Lich Lord scenario 1

The new expansion for Frostgrave was released just in time for our second campaign game. The second campaign game ended up being the first game for the Lich lord campaign. To avoid confusion let's just say this was the first game of the campaign alright? :)


After the last game I invested on a knight to take my total warband size to ten, and to have someone to give the enchanted mail armor I found in the last game to. We played the scenario with four warbands. In the game, the warbands fight during a solar eclipse. LOS range drops steadily until the total eclipse, during which spells are much easier to cast and wizards who witness it gain extra XP. 


With four warbands on the table, fighting began on Turn 1. Everyone scrambled for the treasures in the ruins while fighting enemies on both their flanks. During the game I pretty much kept out of close contact, peppering my opponents with arrows while casting a lot of Leap to get my men to treasure tokens quickly. This paid off and I got out with four treasure tokens with minimal close combat. In the aftermath my thief got a miss next game result (I'll sack the lazy git and get a better warrior to replace him) but otherwise everyone was fine. My men picked up a bunch of gold, a couple of grimoires and a couple of potions. My wizard got four levels which I used to improve my spells. That's pretty much it for the first game. Didn't take too many pictures as my warband is still unfinished.


I skimmed the Liche lord expansion briefly and it looks like a solid expansion. The new henchmen, spells and such left me a bit cold, but the ten scenarios included look really interesting and different. They will probably shake up the "standard game" quite a bit and I look forward for more!

Thursday, November 19, 2015

Frostgrave campaign game 1

Finally got my first complete Frostgrave game in. Didn't get any proper pics for you but I'll log the game here for the other players to see the results.

My starting warband:
Summoner
Apprentice
3 x Archer
Man-at-Arms
Thief
2 x Thug
Treasury: 20 gc
Base: Inn (Chosen after first game)

Game 1: vs. another Summoner warband
Scenario: The Complex Temple

The opposing warband had a two game head start on me, having a better level wizard and better henchmen, but in the game this was evened out by my good rolling. Both players left the table with three treasures and minor injuries. My Wizard got a "never quite as strong" -injury which makes him start every game with one damage already suffered.

Winnings:
Experience: 270 (have not chosen upgrades yet)
Treasury: 250
Grimoire: Reveal Death
Staff +1 Fight
Mail armor +1


A fun game and a good start for the campaign!

Wednesday, November 11, 2015

Black Powder ACW: Henry House Hill

I found a regimental level scenario (WSS 56) for the central engagement of the Battle of Bull Run: the attack of the Union army on Henry House hill, guarded by Thomas Jackson. The scenario was easy enough to adapt to Black Powder. I made the following adjustments to your average BP game:

- Since there were more than twenty regiments per player and only a short evening to play, all regiments are small without any special rules. All commanders have the same leadership value of 8.

- All the measurements are halved for 6mm scale play, and musketry range is reduced further to 9 inches as the small regiment is now "normal".

- Most orders are given as brigade orders for the whole brigade and we're a bit more flexible with what can be done with one order.

These mods led to much faster gameplay as there were no stats or special rules to check out, and the small regiments were easier to rout (which fits nicely with the amateur armies fighting this first battle of a long war). We finished the game in less than four hours, including setup.

I forgot my camera again but here are some pics from my cell phone that are not that bad:


The game looked quite nice with lots of regiments moving about. The Union army, plagued by poor command rolls advanced on the hill. The Confederate artillery was especially effective, breaking one Union brigade early on. A flanking attempt by the Union troops on the Confederate left was blocked by timely reinforcements. A long battleline was drawn and a heavy exchange of fire followed. The Confederates ended on the losing side this time around, falling to musketry fire while holding back the single charge the Union troops launched.

A bit dicey, the musketry duel that decided the battle, but it was still great fun!

Friday, October 16, 2015

Taktillisten tehtävien ratkaiseminen, 1920

I'll make an exception to my normal posts by writing this one in Finnish as I doubt many outside my country find this all that interesting. For an English summary, I found a 1920 Finnish language book containing guidelines on how to conduct a kriegspiel, perhaps the first Finnish language book of its kind. I also found an accompanying scenario book, which was also interesting. If you're interested in this sort of thing and don't speak Finnish, contact me for more details.

Noniin, vaihdetaanpas kieltä niin on luontevampaa. Satuin taannoin piipahtamaan Tuusulan ilmatorjuntamuseossa ja yhdessä vitriinissä huomioni kiinnittyi tähän:


Kriegspielin nappulathan ne siinä ja vieläpä suomenkielisellä selitteellä. Museon urpot olivat lyöneet tuon selitteen päälle tuon vitriinin inventaarion vaikka tilaa olisi ollut muuallakin mutta selitteestä itsestään käy ilmi että nappulat ovat 20-luvulta. Mieltä jäi vaivaamaan että millähän säännöillä noita on mahdettu aikoinaan pelata järkeillen että todennäköisesti ne ovat olleet saksalaista perua. Rupesin googlettamaan asiaa ja löysin tästä blogista maininnan, että Karl Adaridi oli 1920 kirjoittanut "Taktillisten tehtävien ratkaiseminen" -nimisen teoksen sotapelejä varten. Nide sattui olemaan saatavilla antikvariaatti.netin kautta ihan kelvolliseen hintaan niin laitoin tulemaan. En joutunut pettymään.


Kirjassa annetaan ohjeita (ja nimenomaan ohjeita, tämä ei ole sääntökirja) siihen, miten upseerien kouluttajat voivat harjoituttaa kokelaita ja nuoria upseereita taktiikan taitoon karttaharjoituksin, maastossa suoritettavin kävelyin ja sotapelein niin yksittäin kuin joukkueittain. Saksalaisperinne näkyy jo "sotaleikki" -nimessä ja Saksalaisten Kriegsspiel-nappuloiden suosittelemisena. Huomionarvoista on myös, että kirjassa mainitaan sen olevan J. Koivistoisen tekemä suomenkielinen käännös alkuperäiskäsikirjoituksesta. Adaridin nimen googlettelu antaa ymmärtää että mies on julkaissut saksankielistä kirjallisuutta ja palvellut Venäjän armeijassa.  

Ohjeet nojaavat vahvasti kokeneen upseerin kykyyn päätellä mikä on realistista ja mikä ei, mutta tarjoaa osviitat joukkojen liikenopeuteen erilaisessa maastossa, ehdottaa että epäselvät taistelutilanteet ratkaistaan "käyttämällä erityisiä luunappuloita tai vetämällä pitkää tikkua" jne. Skenaariosuunnittelun ohjeissa korostetaan että harjoituksen pitää olla hauska ja viihdyttävä (ajatus jota en ihan heti yhdistä 20-30 luvun sotilasmeininkiin) ja että kummallakin osapuolella on oltava mahdollisuus voittaa. Mainitaan myös että historiallisten taistelujen läpikäynti sotaleikin keinoin on hyvin viihdyttävää ja herättää pelaajissa suurta harrastusta. Niinhän ne tekevät :)

Otin jokusen kuvan sieltä mielenkiintoisemmasta päästä olevista osista


Kerrassaan mielenkiintoinen kirja ja kappale suomalaisen sotapelaamisen varhaishistoriaa. Tarkennettakoon vielä että minulla ei ole mitään viitteitä siitä että tuota ensimmäisen kuvan nappulasettiä olisi käytetty yhdessä näiden Karl Adaridin sääntöjen kanssa mutta eipä tuolla niin väliäkään. Olisi mukava omistaa tuollainen nappulasetti, siinä olisi sellainen antiikkikapistus josta minäkin olisin valmis vähän maksamaan. 

Vaan ei siinä vielä kaikki! Katselin että mitä muuta Adaridi on julkaissut ja löysin kirjan nimeltä "taktillisia tehtäviä" jonka Adaridi on kirjoittanut yhdessä P.v.Gerichin kanssa. Arvasin heti mistä oli kyse ja laitoin ilman muuta tilaukseen. Jep, skenaariokirjahan se. Se, että sotapeleihin on julkaistu ekspansioita jo 20-luvulla on aika huvittavaa. Kirjassa on paljon lyhyitä skenaariokuvauksia jotka olettavat lukijallaan olevan käytössä tietyn kartaston. Suuri osa näistä on tarkoitettu teoreettiseksi taktiseksi harjoitteeksi kouluttajan ja opiskelijoiden välillä, mutta mukana on myös täysiä sotaleikkiskenaarioita.


Hyvä satsi kertakaikkiaan eikä ikäänsä nähden hinnan kiroissakaan. Liekö kertoo jotain tällaisen kirjallisuuden kysynnästä!

Tässä vielä kirjallisuusviitteet jos joku intoutuu näitä itselleen metsästämään:

Adaridi K: Taktillisten tehtävien ratkaiseminen, upseerin käsikirjasto VII, Kustannusosakeyhtiö Otava, 1920.
Adaridi K, Gerich P: Taktillisia tehtäviä, Upseerin käsikirjasto X, Kustannusosakeyhtiö Otava 1921.

Thursday, October 1, 2015

Black Powder ACW in 6mm: Gettysburg Herbst Woods

I started working in the city of Jyväskylä which means some time apart from my family every week, but also increased time for hobby stuff. It didn't take me long to find the first brave general to face me in the field of battle at the local FLGS.

The PM attacks at Gettysburg (wikipedia)

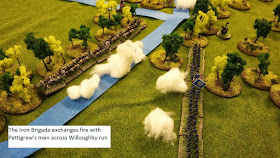
I looked for a small introductory-sized scenario for Black Powder and found one in Wargames, Soldiers and Strategy issue 66. In Gettysburg again, the scenario plays the afternoon attack of Pettigrew and Brockenborough across Willoughby run into Herbst woods and beyond. Against them, the Iron Brigade led by Meredith and Biddle's brigade. I didn't bring my camera so I just have a couple of photos taken with my cell phone.


It's a 4 foot by 3 foot table. We halved the default distances from Black Powder and it worked fine. It was a bit of a tight fit for the four brigades on the table, but worked ok for a tutorial.


Long story short: The Confederates crossed the stream and Biddle's brigade took position behind a long fence. A long firefight began, during which the Confederates unsuccessfully attempted to turn the Union left. Their musketry fared much better and shook the boys in blue pretty bad. Even though the Union troops returned in kind, they could not hold their line. Meredith's iron brigade was forced to vacate Herbst Woods and nearly half of the Union regiments had routed (versus just one of the Confederate regiments) by the time we called the game.

It was a good thing my opponent won, too so that I might have a shot at a rematch ;)

Tuesday, September 29, 2015

SCS Day of Days


A month ago I had the opportunity to participate in my first hex&counter wargame that could be described as a "monster" game. It's MMP's Day of Days, a fresh Standard Combat Series game focusing on the first ten days of the Normandy campaign. The map scale is about 700 meters per hex and the counters represent mostly company-sized forces. Four mapsheets and a ton of cardboard on top!

It's a struggle to present the game in a way that you, my dear readers might enjoy even slightly, so I will only outline the main developments or lack of them per turn. There's a lot to cover even in the main points so I hope the photos make some sense into it. We managed to play the first 9 turns during the weekend in some 22 hours of gameplay including two hours to set up.


Turn 1 + Turn 2 (D-Day begins)

During the first two turns of the game, there isn't much for the players to do other than to roll the dice. Very little choice involved. Big piles of troops are moved ashore and then put back into their plastic bags.
The landing parties at Omaha Beach have to deal with a lot of German strongpoints

US paradrop area and Utah Beach
During the allied paradrops, there was a lot of dispersion for the US forces. The preliminary bombardment went well for the  US, not so much for the British, who did not receive any air support. After the first two landing waves and a ton of dice rolling, Utah beach was clear and Omaha contested. Gold, Juno and Sword were clear also, although there were plenty of strongpoints still close to Sword.

Sword Beach
Juno and Gold

Turn 3

The third landing wave come ashore. The British and especially the Canadians make excellent progress inland, but Sword beach remains bogged down with massive stacks of counters cluttering the area. The British Paratroopers spread out northeast of Caen and take Pegasus Bridge.

Pegasus Bridge was an easy grab, but important. Without this bridge, the British airborne can only trace their supply to their dropzones.

The yanks make good progress inland from Utah. At Omaha the fighting continues, but German strongpoints are surrounded and put out of supply. Pointe Du Hoc mounts a good defence without German losses.

The first German reinforcements arrive swiftly using road movement. Their advance catches some British paras by surprise as they are surrounded.

The German commander plots his moves

Turn 4

The allies get plentiful air support which is put to good use. The more allied forces are landing ashore. Now all the landing areas are clear of Germans save a couple of isolated strongpoints. The allies hit the scattered German defenders hard and the German reinforcements are busy plugging the gaps in their defences. The Germans are also effective in counterattacking some British advance units trying to push as deep inland as possible. A single British tank unit rolls into Caen, but we later found out we had broken an activation rule there. D-Day ends.


I cannot overstate how hard some of these stacks were to handle. Good thing the British spread out from Sword Beach quickly and it was no longer an issue.

Turn 5 (D+1)

Lots of marching about on the British front. You might guess I'm playing the Brits as I have very little time to check on how the Americans are doing. Long lines of battle are forming throughout the map and the Allied advance is slowing down. The Germans defend stubbornly and the British are unable to mount effective assaults. The German players get their long awaited SS troops and finally have some real muscle to put against the Allies.
The US paras get busy
Battlelines are beginning to form near Caen. The SS halt the British advance towards Caen.

Turn 6

The Allies find gaps in the German lines and around flanks and start to pour through. Dangerous bulges in the line are starting to form. Road marches into the rear become a concern for the Germans. The British start to turn the left flank of the German line mid-map in hedgerow country.
A breakthrough of US troops near Omaha, a stalemate elsewhere. Americans are attacking toward Cherbourg. The Allied lack of activations is a hindrance.
Two groups of German units are surrounded and become out of supply.

You can see where the Allied forces are turning the German flank on the middle-to-right side of the picture.

Turn 7: (D+2)

The British continue to turn the German flank, but the Germans deploy a more effective, defensive depth. Fighting north of Caen is a stalemate and the opposing lines become static. Utah front is stable, Carentan is now in reach.
Breakthroughs near Omaha

Turn 8:
              

US forces attack Carentan. The British move in to the countryside in the mid map, blocking several roads. Baeux becomes out of supply Fighting in the mid-map hedgerows is slow, but slight progress made. The allies make dangerous use of road movement to move deep into occupied territory.

The British airborne have been fighting a losing battle against the SS. Now they receive armored support. The Airborne retreat out of contact and the SS receive an artillery pounding. The Tanks move in and break the line. Then they achieve an exploitation breakthrough and wreak havoc on the SS artillery. The Germans scramble to plug the gaping hole so made in the line northeast of Caen.
The Airborne retreat to let the tanks attack the artillery-battered Germans..
The Germans are pushed back and the tanks overrun and exploit..
..to great effect!

Turn 9: (D+3)

The Allied tanks continue their breakthrough northeast of Caen and reach the outskirts of the city.  Mid map, the allies make grand gains by using road movement to capture huge amounts of territory. Some three kampfgruppen are stuck out of supply near Bayeux. Carentan is almost captured, St Lo captured, Villers Bocage captured.

We had to end the game at this point before the German half of the turn, but the result was not in question anymore. The allies had achieved major breakthroughs in the German lines and it was doubtful if the Germans would be able to turn the tide even in a longer game.


The map at game end from left..

..to the center..
..and finally to the right.

Post-battle thoughts:

An exhausting but also rewarding game! We had a good group of players and the whole weekend was enjoyable. I liked the game so much that I went online to buy It Never Snows right away :)

As for the strategy involved, the pressure is on the Germans. The Allies have plenty of troops to just keep hammering away at any weak points they discover even though they can't brute force their way through well defended areas very easily. The Germans, however, are badly outnumbered and have to play their defence smart in order to stay alive. They need to deploy deep and sparse and try not to get swamped. If they try to "hold the line" in one place, they will be hammered by the built-up Allied superiority and lose. There is plenty of bocage to to retreat to however, and the German players have to take advantage of that. Our Germans learnt their lessons and caught on, but it was too late and the campaign was lost. It would be interesting to play this again with the same group and see if the Germans could fare better.

Also, be wary of Road Movement! The German player has to take extra care not to leave any roads open for enemies to march through. The road movement rules allow for simply ridiculous marches into enemy territory and can really ruin your day. I think these rules need an overhaul as the Road Movement rules lead to some pretty unrealistic situations where the Allies can march entire divisions via small country roads into the rear of the German army. This is a minor gripe in a very good game though.