Pages

Sunday, January 22, 2012

Scourge of War: Antietam screenshots

I took some screenshots from Norb Software's addon to their Gettysburg game, Antietam.

Action at Burnside's bridge

The grim harvest after a day of battle at the Antietam cornfield

Union troops mount several attacks to the sunken lane

Both sides are exhausted after a prolonged engagement, but the sunken lane remains in confederate hands

I recommend the game for any PC wargamers out there. It may look dated, but Total War games have nothing on tactical and strategic depth compared to this one.

Friday, January 20, 2012

Converting Hail caesar for 6mm, first playtest session

I got Hail Caesar on the table today together with one of my regular opponents. I have been toying with the idea of starting a new period, and with the release of Hail Caesar by Rick Priestley and the release of new Greek sculpts by Baccus, I'm tempted to do a hoplite greek set.

Shining bronze, detailed shields and naked greek men. What's not to like?

There are some considerations before I pull out my Visa. First, will Hail Caesar work with 6mm miniatures, and what basing would work well? Second, is the game better than say, Warmaster ancients? Well, I've only skimmed the rules of Warmaster and never played it, but since both games are Priestley's work, it's a good base assumption that the new game is more refined than the old. Do I hear the cries of "Cult of the new!" over the horizon? Maybe it was just the wind.

Hail Caesar is primarily designed to be played with 28mm miniatures on a table which allows a 36" space between the opposing lines at the start of the battle. I wanted to try out one of the example scenarios in the rulebook, but there were no guidelines in the book on what size the tables are in the scenarios. Now, Priestley states many times in the book that players are free to tailor everything to their needs (as if we needed permission) but I think in published scenarios it is nice to know the relative distances between the forces as this impacts scenario balance. I asked about it on the Warlord Games forum and got a reply from Priestley himself:

Most of the games were played on Alan or Michael Perry's wargames table - both six feet wide and usually ten or twelve feet long depending on how its set up.

The Sassanid game and the Roman/Celt game were played on John Stallard's table - which is more like five feet by ten if I remember right - it does depend on how things are set up. The Roman/Celt game was re-photographed after the event - the Sassanid game was photographed as we played.

Three feet apart is good for a very standard type of 'line em up' style game - basically both sides deploying within six inches of the table edge of a four foot wide table. That's a realistic table size of most people I think (including me!). The games in the book are all much more narrative apart from the Sassanid game - which is fairly close to a line 'em up game - so the sides start off often much further apart. Three feet puts both armies out of 3 moves at the start of the game - which is what I'd aim for.

Rick

Now, 6 feet is a pretty deep table, 182,88 centimeters to be precise. It's possible to have a table that big in your average home but it will be difficult to set up a game and have enough terrain on it to keep it attractive. Here's where the 6mm scale shines. Baccus miniatures are designed to look best on a unit stand with a 60 millimeter frontage. The frontage of your average 28mm Hail Caesar unit is stated to be somewhere around  160-200 millimeters, that is eight to ten infantry wide, if they're based individually on 20mm bases. Suppose I just shrink the game so that each inch from the rulebook counts as a centimeter? This means that the 6 foot deep table would now be only 72 centimeters deep. That's almost a DBA sized table! This means I have to shrink the units as well. A Baccus infantry stand 60 centimeters wide would with this scale be the same as a 152,4 millimeter wide unit on a "big table". Close enough for me, and I'm sure it works gameplay-wise as I'll probably end up doing all the armies for this set anyway. The depth of the units is not an issue according to the author, anything that looks appropriate should work. I think for depth I'll stick with the 1:2 ratio to the frontage, as this would allow the stands to be used in a variety of games.

I deemed it necessary to play a test game or two with the rules before committing any money to figures, so I made some print & play units for hoplites, light infantry in open order and cavalry.


Here's an example of the units I made. I drew them on a computer, printed them out and glued them on cardstock. The hoplite units are, at the moment divided into two blocks, as it allows me to use the different formations in the game without resorting to markers. There's a small light infantry unit which I though should at most be half as deep as a hoplite formation. Then there's a small light cavalry unit. The "figures" should have a footprint more or less equal to what the corresponding 6mm figures would have. 

The example scenario we played was a small two division versus two division fictional battle set in the Peloponnesian war. The Spartans and their allies are attacking a road held by the Athenians and their allies. A simple line battle with no special twists. There was an ambush rule in the original scenario, but that would have been difficult to do without an umpire so I didn't include it.

The opposing forces meet. The many dice near the units are for keeping track of casualties as you don't remove figures from the units in a game of Hail Caesar. Another thing in favor of 6mm armies, but it does give the game a cluttered look until I get some casualty tokens.
The game was straightforward. The Spartans advanced on the Athenians. The Athenians, being more numerous, attempted to flank the Spartans with poor success. Battle was joined, casualties suffered, and the Spartan elite hoplite phalanx was left king of the hill, being the only unit not shaken at the end.

This was a learning game so we got some rules wrong which were possibly game impacting ones. That didn't matter as we had a fun evening even with these small forces. It took us around three hours to play the scenario and after learning the rules, I think this'll finish in less than two. The 6mm basing worked well for the hoplites and cavalry, but I still have to think about the basing of light infantry. They can change between open order and formed quite easily and making open order visually obvious gives me some thought. Should I have one or two of those small rectangles with figures in scattered formation or put them on a circular stand? With a circular stand the open order formation is immediately obvious, but it might be difficult to position the troops in some situations, and you can't have a long string of skirmishers when they're in one "horde". In the very least, I might end up doing separate versions for light infantry in formed and open order mode as it won't be much trouble. 

Every Phalanx shaken except the Spartan one. No, I don't want to hear the catchphrase.
I can't give much insight on the rules before I play a couple more games. It's obvious however that veterans of Warhammer and Warmaster should feel right at home in this one. The terms are different but the rule mechanics are very familiar. Especially the different special rules which you can give units had a very Warhammer-y feel to them. The biggest departure is probably that you don't need to pay wheeling costs for units. You just move into the direction you want and pivot the unit to the facing of you desire when you finish. If you move within 12" (or 12 cm in my case) of an enemy, you have to face that enemy and can only move towards or away from that enemy as long as you are within 12". If you announce a charge, you have to move into contact by the most direct route, eliminating the chance of overly agile flank charges. It seems to work fine, but I'm not yet sure if hoplite warfare has the right "feel" with these rules, or if they're more at home in the dark ages.

Ok, if you actually read this far, you're a better man than I and deserve a rest. I'll continue on the subject on a later date as my plan evolves.

Wednesday, January 11, 2012

Games I played 2011

I did a count of the games I played during the last six months of 2011. Around summer I took the habit of logging all my played games on this blog so I think I should have every game I played here. Pretty wargame heavy, and I'm happy about the amount of wargaming I was able to do.

Fire and Fury: 4
ASL:3
Maria: 2
Musket & Pike: 2
Attack Sub: 2
Brandywine: 1
C&C: Napoleonics: 1
Men of Iron: 1
A victory denied: 1
War of 1812: 1
Julius Caesar: 1
Fighting Formations: 1
Sid meier's civilization: 1
Battle Cry: 1
Risk 2210: 1
Dominion: 1
Monty Python Fluxx: 1
Wings of War: 1
Lexio: 1
Zombies!!!: 1
Hedelmätarha: 1

Tuesday, January 10, 2012

Fire & Fury: Gettysburg day 1 in 6mm

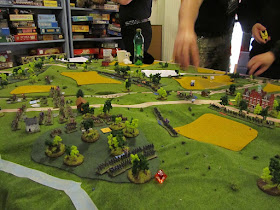
An overview of the field
We had a big Gettysburg game last Saturday with yours truly as the proud host. After the Bull Run game we played last summer and the Port Republic demo I organized in the autumn, I had a good base collection of miniatures and terrain for Gettysburg. I only did some cavalry for the Union, some infantry for the confederates and some small terrain work. The scenario is from the Fire & Fury rulebook with the portion north of Carlisle road omitted. This scenario would not see Ewell attacking the XI Corps defending Blocher's knoll, but I wrote the events into to scenario so depending on die rolls, the XI Corps would fall sooner or later and a confederate brigade of variable strength would appear from the north edge. Being generous, I made it possible for the XI Corps to hold their ground with very good die rolling and even send one of their own brigades to support the Union. I think this created a bit of uncertainty regarding the table edge and gave the players a reason to steer clear of the fighting going on off map.

The generals plot their movements
I was hoping I would get some new people to participate in this game and I was a little worried as before the con I hadn't received any messages from people wanting to join in. To my relief people started coming to me asking about the game and expressing their interest during the convention and on Saturday morning we got a visit from an eager group of wargamers from the nearby town of Varkaus. In the end we had 9 people taking up roles on the battlefield during the day, and only three of them had ever played Fire and Fury before! This meant that the two most experienced players including myself took up the roles of Corps commanders and acted in semi-umpire roles concentrating on advising the new players how to make their moves rather than plotting our own.

a view from the seminary at 10 am.
The scenario started at the 10 am turn (1 pm IRL time) with Heth's division facing Buford's cavalry division. Reynolds had just arrived on the field and Wadsworth's Iron Brigade was sneaking behind Herbst Woods to attack the Confederate flank at McPherson's Ridge. The Confederates started with an aggressive push against the Union cavalry. Buford's carbine wielding soldiers proved more than a match for them and sent them back to McPherson's ridge after some disorder results and casualties. Heth couldn't do much more than attempt to flank the union line from the direction of Oak Hill, but Union reinforcements blocked that approach also.

The union generals assemble. We've had a house rule that generals may not discuss strategy unless their "avatars" are physically close on the field. Often it results in an officer's club meeting that looks like this.
Pender's division arrives to support Heth.
The iron brigade holds the union left.
After some waiting Pender's division arrived on the field with some muscle and the attack on seminary ridge began anew. In a terrible hailstorm of lead the division was badly damaged on the approach and couldn't mount enough forces to throw the Union forces out of Seminary Ridge. At this point, the confederates had failed two charges on the ridge and the Union defenders were yet to lose a single stand! It wasn't looking too good. To make matters worse, The Iron brigade sent Pettigrew running back from Herbst Woods and was threatening the Confederate flank. If they could muscle their way through the Confederate artillery line, it would all be over.

Pettigrew and Wadsworth battle it out in Herbst woods. And yes, I know the Louisiana Tigers aren't supposed to be there! I ran low on stands!

At this point, the Confederate flank attack began. Rodes' division from Ewell's Corps arrived from the direction of Oak Hill and began a steady march towards Gettysburg. Heth was waiting on the Northern part of Seminary ridge just outside musketry range for Rodes to flank the Union defenders.

Rodes arrives and begins to turn the Union flank
Heth moves on Cutler.
 Seeing they would be soon be attacked from two directions, the Union generals made a risky decision. Heth and Pender were in bad shape on McPherson's ridge and the Union forces on the Seminary were still fresh. If they could rout the Confederates of A.P.Hill's Corps, they could then concentrate a larger force against Rodes. The Union attack slammed into the Confederate line and sent Pettigrew back. The Iron Brigade marched out from Herbst Woods and found itself the target of every Confederate gun on McPherson's ridge. From the Seminary, Buford's cavalry charged (while dismounted!) down into the depression between the two ridges but was sent running. One of Doubleday's brigades was shot so badly on approach that they broke and ran, leaving a gap in the Union line.

Union forces counterattack the ragged rebels.
The iron brigade drives Pettigrew all the way to McPherson's farm but expose themselves to rebel artillery in the process.

 The Confederates were quick to exploit this gap and charged the exposed batteries on Seminary Ridge, forcing them to retreat. The Union line was now cut in half, but A.P.Hill's Corps was in no shape to take advantage of this. Buford's cavalry and the Iron Brigade were still in good shape and a constant threat on the flank, even after the Confederate artillery forced the Iron Brigade to retreat back into Herbst Woods.

With Rodes' division pushing the flank, the Union line begins to turn towards Gettysburg.
 The Union generals' gambit had failed however, and they were running out of time. A couple of brigades marched to stall Rodes, but he sent everyone in his way running. The remains of Heth and Pender pressed the defenders on one side and Rodes was sweeping the flank. The Union line tried to refuse their flank to stop Rodes but it couldn't be helped.

At this point the Varkaus crew left and four generals remained to finish the three hours of scenario we had left. A tally of victory points showed that the Union was in a good lead at this point.

Rodes couldn't be stopped. The Union flank was too open and the forces were too few to stop him. The rest of the scenario was spent with the Union forces conducting a fighting retreat towards Cemetery Hill. Buford's cavalry and the Iron Brigade attempted to make it to Cemetery Ridge for a last defense, but the pursuing Confederates caused severe casualties during the retreat, including Buford himself, who caught a musket ball and fell to the ground.

Rodes pursues the Union forces relentlessly towards cemetery ridge.
Off map, XI Corps held long, but collapsed eventually. Rodes' division was joined by Doles' brigade, which had suffered during the attack on the Germans but was still in fighting condition. Rodes marched past Gettysburg towards Cemetery Hill scattering Union brigades whenever he could catch them. The line of Union defence was hastily arranged on the foot of Cemetery Hill, and the Union cannons tore great holes into Rodes' division. In this storm of lead, Pender fell, leading the remains of his division. The Confederates were finally getting worn, but managed a final charge on the line, capturing the Union guns and leaving the way to Cemetery Hill nearly open. Reynolds too was captured at this point, having averted his historical fate earlier.
 
The final engagement between Gettysburg and Cemetery Ridge
The scenario ends with Union troops just barely holding onto Cemetery Ridge.
At this point the scenario ended as Ewell didn't find it practicable to continue the assault. The players found it a sound decision as it was 1 am IRL time and the generals were quite spent. In the end, the Confederates won with 34 victory points against the 33 points of the Union. A close victory for Lee. The events proceeded more or less historically, but the Union forces did fare better than their historical counterparts in my opinion. Especially Buford's cavalry continued to be Reynolds' best asset throughout the game. The -2 "shooting at dismounted cavalry" modifier made them all but impervious to musketry, especially in woods, and in close assaults they were equal to line infantry (which made me think whether a stand of dismounted, skirmishing cavalrymen should equal a stand of formed line infantry at close range).

The game was a great success because of all the great generals we had controlling the forces. Everyone seemed to be in great mood and eager to play in the spirit of the period. The usual quotes were heard and we had a blast. I'll take the opportunity to thank the Varkaus group for showing up. We had a great time and I hope to see you at the Officer's Club in the future! Also worthy of mention is Janne, the overall commander of the Union forces, who couldn't help but expose his avatar, Reynolds to danger again and again, feeling the call of his historical fate. I'll hopefully meet you in the Shenandoah Valley next!

Monday, January 9, 2012

Kinkkucon 2012: Miniatures gaming aplenty

Kinkkucon is a boardgames centric con in my hometown of Kuopio and is held each year in the first weekend of January (the one after new years'). It is dominated by eurogames and FFGames but there has always been a small group playing wargames and miniature games. I always complain that my lovingly painted miniatures are just buried in cardboard boxes and never see any play so I tried to remedy the situation this year. I ended up playing almost every miniature game I have in my inventory so I'd say I was succesful.

Thursday

The convention started on thursday and most of my afternoon was spent hauling boxes and boxes of miniatures and terrain to the convention site and trying to put them in a safe place. Luckily the convention was in my hometown as I had a full carload of stuff and brought some more the next day. I did manage to squeeze in a game though.


Warhammer Quest has become something of a Kinkkucon tradition for me and a few friends, and we actually had a living party from last Kinkkucon to continue our adventures with. For those of you who don't know, WHQ is a classic dungeon crawling game from the 90's, made by Games Workshop. It is a continued development from HeroQuest, of which I'm sure everybody should have at least heard legends about. WHQ is good fun. It is very difficult on the lower level characters and most adventures we've had at Kinkkucon have ended in partywipe and a victory for the Dungeon of Doom. The game is also notoriously random and known for the utterly broken campaign rules, but I have a soft spot for the game and it gives me the excuse to paint a few fantasy figures every now and then without the need to commit to a larger project. This time I spent friday morning painting the Chaos Warrior character of one of the party members. The same Character who has now stacked enough non-magical armor so that average enemies can't touch him and minotaurs will have a hard time scratching him. *sigh*
It came out ok for a quick morning paintjob, even though I couldn't get the highlight on the helmet to look remotely ok. I got the chance to test out the GW snow thing, which is basically short strand white static grass. Viewed from a distance it looks like a nice, fluffy coat of snow, and can be used to do simple snow bases really quick.


Friday

On friday I got to play some more of GW's minor games. First, I played a couple of games of Space Hulk. After Blood Bowl, I think this is my favourite of the GW "Specialist games" because of the ease of play and the quick, adrenaline filled atmospehere. I own the first and third editions of the game and this was the first time I played the third edition with a completely painted set. I played Alarm Call with two different opponents. The first was against an experienced hulk player as the marines. I failed quite quickly and the match took about 10 minutes or so. After the match I noticed the librarian has some rather useful spells I could have used, but I didn't remember to use them. My mind was attuned to 1st edition Deathwing when the librarian could only use force points to augment close assault.

The second match was against a new player. I took the opportunity to teach the rules to a new player as the game was still set up, and although Alarm Call is hardly an introductory scenario, my opponent played a fantastic game. He lost half of his team in the early stages, but the librarian and the sergeant of the team hung on, trying to complete the mission to revive fellow marines and escort them off table.

The blood angels move back-to-back in search of fallen comrades.
The last required marine is woken, but the genestealers are rushing in from every direction.

He woke up the requisite last marine and made his way towards the exit. At this point I had lots and lots of blips on board and thought he'd have no chance to survive. Boy was I wrong! By blocking his rear with a psychic barrier and thus preventing the genestealers attacking from behind, he concentrated on the way out. I had a huge horde of genestealers to throw at him and throw them I did. On one turn, I think the librarian shot 6 genestealers in a overwatch area of two squares and killed one in melee. On the second turn he failed overwatch but killed something like 7 genestealers in melee and I don't think he needed to spend a single force point! How's that for a probability anomaly? I was left quite humble and impressed.

The evening was spent playing Mordheim, GW's fantasy skirmish level game. Again I took the opportunity to teach the game to new players, and managed to get no less than six players on the same board. The warbands involved were Skaven, Undead, Reiklanders, Middenheimers, Dwarves and Beastmen. We had two teams of three fighting a king of the hill type scenario. It got a bit chaotic and confusing with so many warbands, but at least it worked as a good tutorial. The second game we played was with four warbands in two teams, and it was a better experience for multiplayer Mordheim. I got to play with the ruins I based some three or four years ago for the first time!

Middenheimers, Reiklanders, Skaven and Undead fight for the control of the village square.
 Oh yeah, I also played a quick game of Genial in the morning, just for logging purposes :)

Saturday

Saturday was a big day for me as I hosted a Fire and Fury game with no less than 9 players. We played an almost complete first day of Gettysburg, which I'll discuss in detail in a separate post.


Sunday

Still tired from the last day of gaming, me and my regular ASL opponent decided to play a small scenario,  s105: Going to Church. The name was appropriate and it gave us a chance to play with the british OOB I purchased last autumn. It was a simple scenario pitting elite canadians against the SS defending a church.

I played the SS and took the opportunity given by the scenario to split all my squads to half squads. The only downside was a reduced range but since the scenario called for the canadian to break all the multiman counters in the church, I reasoned it to be a smart move. The scenario states that the canal doesn't exist and that all hedges are treated as stone walls.
The Canadians cautiously advance to my LOS, but I hold fire, determined to hang on to my protective concealment as long as possible. The Canadians get in position to fire encirclement to my forward teams and make life difficult for them. I'm lucky with my interdiction rolls and manage to rout to the church unharmed.


The Canadians attempt to encircle the church from the north and catch some fire in the open ground.
With a solid morale value of 8 they easily cross and man the wall north of the church. I do a stinker of a move next turn and skulk my forces out of sight, only to advance them into defensive position later. This robs the canadians a chance to shoot with most of their forces. It's a gamey move but hey, my opponent pulled the same trick on me once before. Payback!
On the last turn the Canadians try to overwhelm the defenders but as the SS had only lost one half-squad before that, the attempt was doomed to fail.

The match went poorly for the Canadians and we were left with a feeling that the scenario isn't balanced. It was a nice little game and now that I think of it, I think it was the first game we've played when we hardly needed to touch the rulebook. It was a good game to finish Kinkkucon and head home after that.

Overall, I was very happy with the games I got to play and I thank the organizers for the opportunity to play in a con without having to travel hundreds of kilometres!